slider

5/31/14

Glitz Design: Classy & Fabulous

Hi there!!  Happy Saturday!  I'm up on the Glitz Design blog today sharing a classy & fabulous layout starring my sweet little lady!  This picture was taken about two years ago and it just melts my heart to see how quickly they grow. 


I used a large photo here with a few smaller embellishments.  I really wanted my photo to shine.  Hop on over to the Glitz blog to read more about how my page came together.  You can also find my supplies there.


Be sure to check out the Glitz blog for more awesome inspiration from the Design Team!!  Hope you have a classy & fabulous weekend!

xoxo

5/30/14

Challenge: Embellishment Clusters


Thank you so much to those of you who played along with last month's challenge!!  I love love love each and every layout and am just so grateful that you all joined in with me!!  I am always amazed at all the different interpretations of a challenge!  You guys are awesome!


I have a new challenge for you all today if you would like to play along!  I was super inspired by the lovely Maggie Holmes and her recent post sharing some tips for adding embellishments to a layout.  You will likely always see some type of cluster of embellishment on my pages and projects.  There is just something about adding in a few pretties that finish off a page to me.  

Here is my page for this challenge:

For my layout, I started with my photo and a few of my favorite embellishments from the Styleboard collection.  I like to use a good mix of light and dark colors when I'm creating clusters.  I think the warmer, darker colors, like the brown and cork, help ground my page and keep my photo from getting lost in my background.


As you can see, I always like to layer my clusters to give them a little movement and dimension on my page.  Layering helps keep the cluster from being too large or too distracting.


For my background, I sewed a few strips of Styleboard patterned paper to the top part of my page to create a base for my photo.  I randomly trimmed my papers at various lengths and widths and layered them over one another for a messier look.


I also created a little tag cluster at the bottom of my page to help balance the heavy portion at the top. I kept it small and simple, but I think it's pretty effective.  

And that's it!! I can't wait to see your take on this challenge!  Link your projects up here when you are finished so I can see them all!!  You can also tag me on Instagram!!  

Happy creating!

5/29/14

Project Life Giveaway


I love Project Life and I thought I would share the love today!!  I've made a point to add more photos to my album this year and it's been awesome.  My pages are definitely very photo heavy, but it tells our story and I love that!  But...by using more photos throughout my spread, I have found myself swimming in Project Life supplies!!!  What better way to clean house than to have a giveaway!!  

Cleaning house and moving supplies always makes me stop and look back at our albums and books.  I fall in love with my Project Life albums all over again and find myself sitting for hours just looking and reminiscing!!


Each of these spreads just brings back so many memories and recharges my creative energy for getting those weeks and months done!!  And never once do I think about those days/weeks/months that I didn't photograph, or just threw somethings in a pocket.  I treasure those memories I have saved and can't wait to document more!!

If you haven't tried Project Life yet, I couldn't recommend it more!!  It's so easy and really can be anything you want it to be!!  

So to celebrate my cleaning and my love of Project Life, I would love to pass on some goodies to one of you!!  

There are several ways to be entered to win:
1. Leave a comment here on this blog post
2. Leave a comment on my Project Life Giveaway post over on Instagram, tag it #stephaniemakesprojectlifegiveaway
3. Follow me on Pinterest and pin the above photo!

I'll choose a winner next Friday, June 2nd!  

5/28/14

Photo Editing Tips for Photoshop Elements

I love using Photoshop for photo editing, collages, overlays and the like, but it did take me quite a while to figure out the program and how to make it work best for me.  I know a few of you awesome blog readers have asked for some tutorials regarding how I edit my photos, so I thought I would start sharing a few of my tips here on the blog.  Every other Wednesday I plan to share a new walk through video or tutorial using Photoshop.  I'm obviously not sharing anything earth-shattering or new, and there are plenty of other videos and tutorials out there, but I just thought it would be fun to share my process and ideas!!

Here is the first video.  It covers brightening up photos using Photoshop, as well as Picmonkey.  It's a better version than the one I posted at Two Peas a few months ago.


So what would you like to see?  I have a list going, but am always happy to add any requests to it!!  Thanks so much for stopping by!!


5/27/14

Two Peas in a Bucket: Dear Mom

I'm sharing a little piece of heart in this week's Capture video at Two Peas in a Bucket.  The theme this month at Two Peas is History & Heritage and I decided to take a little time to reflect on the memory of my mom.  In the video, I will walk you through a few pages of my art journal (using a similar fashion to Project Life pages).  I hope you will check it out!!
Here are a few of the pages in my book.  You can see my complete art journal in this post, and you can find all the products I used for these pages over at Two Peas.  


5/23/14

Two Peas in a Bucket: Project Life - May

I had a new Project Life spread up at Two Peas in a Bucket this past weekend!  This spread covers the first few days of May when we went to visit my brother in Virginia Beach.  I knew I wanted to use a big photo for this week, and I just can't pass up a blown up beach photo.


The right side of the spread has the large photo, which I divided up in Photoshop and printed as 4x6 photos.  I cut with the "you are my fave" title with the Silhouette and then added in over the photo in one pocket.  I love how you can still see the ocean through the words!


The left is your typical photo, calendar, journaling cards.  Small little embellishments like paperclips, stars, tags and stitching add the best finishing touches, I think!


Ahh....hello beach.  You really are my fave.


5/21/14

Glitz Design: Enjoy Every Moment


Making mini albums is still my favorite.  Whenever I feel like I might be in a creative slump, I usually start trimming paper and make a mini album.  There's just something about those smaller pieces of paper and embellishments that help bring back my creativity!  

I put together an accordion mini album for Glitz Design this week to highlight their Bits & Pieces 12x12 paper.  


The Bits & Pieces paper are perfect for trimming out cards and adding them to layouts, Project Life albums and mini books.


I used two pieces of card stock trimmed to 4 inches to create an accordion mini album.  I wanted to play off of the graphic feel of some of the cards and trimmed my photos on a diagonal.  I love the contrast between the photo and the white space next to it.


I decorated both the front and back with cards, photos and embellishments.  I love the way it turned out!  Just a fun little snapshot of our days!  

5/20/14

Remembering Me | May 2014


Did you know that May is National Photography Month?  It sure is and I'm snapping away this month!  I love photography projects and I'm always on the lookout for new ways to document our days.  I decided to get myself in front of the camera during this month and have managed to snap a photo of myself every day so far (yay....that's a big accomplishment for a gal who likes short projects!!).


When I started thinking about this project, I knew I wanted to capture me with my kids.  We are always together, running here and there, and most of my photos are of my kids doing cute things....meaning, I don't necessarily make an appearance very often.  I do try to snap a few pictures of us together throughout the month, but they are more "look at the camera and smile" type of photos rather than our everyday interaction photos.


Some days are more "creative" with the photo than others, but each and every one depicts our EVERYDAY and that's what I love about this little project.


I'm using my iPhone only for these photos and some are grainy and dark, but I'm ok with that.  I don't plan on enlarging these photos, so the overall quality isn't really an issue with me.  I have also been using my Timercam app A LOT, which is just plain awesome.  


(Redundant photo, I know, but it's just my favorite. Ever)
This photo was taken with the Timercam app and I just love it.  It really is what our day is like....everyday.  Being silly, laughing, begging to be flown around in the air, someone holding onto me, etc.  To take this photo, I simply placed my phone on a table, turned on the Timercam app, hit the capture button and ran back to what we were doing.  I love this capture.  And this photo is what I want my children to remember of their childhood with me....laughing, playing, being silly.


I'm using the Collect App to keep track of my daily photos and will likely export them and print them out to use in my Project Life album.  I'm sure these photos will also likely make an appearance in some type of mini album and probably every scrapbook page from here until eternity.  Either way, I'm sure you will see lots more of these photos.

xoxo

5/19/14

Hazel & Ruby / Michaels Arts & Crafts Reveal Party and Blog Hop


Welcome to the Hazel & Ruby / Michaels-Arts & Crafts Reveal Party and Blog Hop!


All month long, we have been celebrating our little secret....

Michaels is now carrying the entire line of Hazel & Ruby Stencil-Masks, Wrap It Up Paper, & Pass the Tissue Paper!  Now, it’s super easy to hop on over to your local store and pick up our amazing products.  We have made DIY easy and fun for everyone!

To celebrate handmade, we have gathered together some amazingly talented bloggers whose passion is to create, make and share every day. Some of these ladies will be regular contributors as part of Hazel & Ruby's Makery team, so you will see a lot more from them in the future. Each one will share project inspiration, product tips and how-to’s to teach and inspire. We are so excited to introduce you to each one of them and get ready to be awed!

For the next 2 days, you can hop around to each of their blogs, stopping by to say Hi and Hello!  Everyone is super excited to share their project ideas with you and how they were DIY inspired.

Simply follow the Blog Hop list below as you hop from one blog to the next.  Lost?  Return to the Hazel & Ruby blog to see who is next on your hopping list!

Hazel & Ruby  http://www.hazelandruby.com/blog/
Amber Packer  http://www.amberpacker.com/
Carmen Rogge http://theflairexchange.com/
Cheryl Sorce http://www.aprettycoollife.com/
Jana Eubank  http://janaeubank.wordpress.com/
Kelly Rowe http://livelaughrowe.com/
Margie Romney-Aslett  http://www.margieromney-aslett.typepad.com/
Ronda Palazzari  http://rondapalazzari.typepad.com/
Stephanie Bryan  http://stephaniemakes.blogspot.com/ (YOU ARE HERE)
Tamara Jensen  http://tamarajensen.typepad.com/lifeisanartform/
Tammy Tutterow  http://tammytutterow.com/blog/
Thuy Bui  http://www.mypaperpinwheel.com/
Tina Walker  http://adogslife-thirteen.blogspot.com/
Hazel & Ruby  http://www.hazelandruby.com/blog/

But what’s a Blog Hop without a giveaway?  Nothing, you may ask!  ;)

In Hazel & Ruby style, we like to celebrate BIG, so we will be randomly picking a winner who will win a prize package worth $500. We will be announcing the prize package over the next couple weeks, but it will contain product from your favorite manufacturers! (we like to keep secrets, can you tell?)

What do you need to do?
Leave a comment on the Hazel & Ruby blog AND on the blog post of our talented makers telling us what you enjoyed most about their ideas.  Easy Peasy!

We will also be featuring each of these ladies on our Hazel & Ruby blog over the next 3 weeks.

We will select a winner on June 6th and stay tuned for more details on the prize package (oh the suspense!!)

Blog comments are due by midnight MST, June 5th to qualify for the drawing. Winners will be announced shortly after the end of the comment period, so be sure to check back to see if you've won.

Want more Party?  Don’t forget about our Instagram Party!  Get out those cell phones and take a trip to your local Michaels-Arts & Crafts Store.  Show us how much you love Hazel & Ruby by snapping a
picture of the Hazel & Ruby display in the store.

You know what we would love even more? Take a #selfie with our display!  Tag your IG photo with #hazelandrubyslittlesecret and share it with us on Instagram.

On June 1st, we will be selecting one (or two) winners to win the ENTIRE Hazel & Ruby collection!  How awesome is that? If you aren’t yet following Hazel & Ruby on IG…. you can find us at @hazelandrubyhandmade.  Be sure to follow us so you don’t miss out on all of the fun and creative inspiration. Remember…sharing is caring….we would love you to share our good news with your friends.

Not on Instagram?  Please share your Hazel & Ruby projects with us on Facebook.  Really and truly…one of our greatest joys is seeing what YOU create.  You never know, we may feature your project on our Blog!

Are you ready to Hop?  Let’s get started!!!

I am so honored to be a part of this Hazel & Ruby / Michaels Arts & Crafts blog hop today!!  Thank you so much for stopping by!  You probably are coming over from Ronda's amazing blog!!  Glad you are here!

When I received my lovely goodies from Hazel & Ruby, I knew I wanted to create another art journal using the stencils/masks and paper rolls.  I grabbed a few other of my favorite supplies and had so much fun putting this mixed-media art journal together!!  Let's take a look!!


My art journal is a mix of canvas, Hazel & Ruby tissue papers/wrap it up papers, glassine bags and more all bound together with book rings!  It's just a like a little piece of happiness to me!!

The building process of this book was so easy and I'm super excited to share it with you today!


The front/back covers of my book are made from an extra canvas bag I had in my stash.  I used the "My Sunshine" words from the Child's Play stencil set and some mist along the middle of my bag to create a title.  


I used another bag I had on hand to create a pouch at the end of my book.  More on that in a bit!  


While I had my stencils out, I also used a few stars to create a journaling spot on the bottom of a piece of chipboard.  


To give my book a finished look, I used my sewing machine to stitch around the edges of my cover/end page.  


I also stitched around the seam of my polka dotted pouch to create a smaller bag for my book.  Instead of trimming my bag down and trying to stitch it back together, I like to just sew around the edges and then trim the excess off.  This ensures that you have a nice straight line and your fabric stays together. 


To give my book a little more sturdiness, I decoupaged a piece of chipboard onto the back side of my cover/end page.  Originally I had planned to keep the canvas bag as one piece (as shown above) and use binder rings through my bag and pages, but my rings were too large for this.  As you will see below, I trimmed down the middle of my bag to separate the front cover from the back.


My next step was to build my album base pages.  This is my favorite part!!  I love starting with a blank space and adding on pops of color, paint, mist and ribbon.  I used a variety of techniques here including sewing, painting, misting, and decoupage.  The Hazel & Ruby tissue papers and wrap it up papers worked perfectly here!


Once all of my paint was dry, I grabbed my photos and started assembling my art journal.  I tried to let my photos direct how I used each page.  Some are a little more "artsy" and some a little more "scrapbook-y" (is that a word?). I love mixing up techniques and tend to "go with the flow" when creating!!


As I mentioned above, I trimmed my canvas bag down the middle to create a front and back back.  I love the messiness of trimmed canvas.  All the little strings hanging down add the perfect touches to my journal.

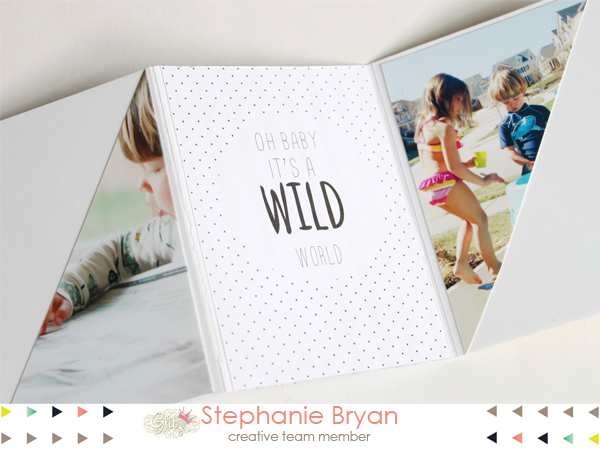
Here's a look at my art journal.  It just makes me smile looking at each page!!  


Thanks so much for joining me today on this Hazel & Ruby / Michaels Arts & Crafts Blog Hop!!  I'm so excited that you stopped by!!  Your next stop on the blog hop is Tamara's blog.  Don't forget to leave a comment along the hop, as well as over at Hazel & Ruby to be entered to win a prize package worth $500!!  How awesome is that??

Happy hopping!!


5/16/14

12 on the Twelfth: May Pictures


It's been such a busy week on my little blog that I haven't had a chance to post my 12 on the 12th photos yet!  It was a pretty typical day and I love that I was finally able to capture an "ordinary" day for us.  Taking 12 photos is still quite a challenge, though, when life is going full speed ahead.  It's the end of the school year here and I am swapped with assignments....  but what I really love about this project, is that it makes me stop and look at our day AS it's happening.  Sometimes things move so fast I can only appreciate our day-to-day once it's happened.  Documenting May 12th reminded me of all that I have and all that I am thankful for.  So cheers to the camera! 

Here's a look at our day:


Did anyone else play along??  Link up your photos in the comments section if you did!  I would love to see your day!!  

Happy Friday everyone!!  
xoxo